
-p-130x130q80.png)
Data integration and workflow management are becoming essential elements of contemporary enterprises. Businesses are using cloud-based solutions to manage their data integration and workflow management responsibilities as a result of the rise of cloud computing. Compute Engine (CE), one of the cloud computing services provided by GCP, enables you to build virtual machines whenever you need them.
To simplify the data integration process, many organizations are turning to tools like Airbyte and Apache Airflow. Airbyte is an open-source data integration platform that enables you to connect to various data sources and move data between them. Apache Airflow, on the other hand, is an open-source platform for programmatically authoring, scheduling, and monitoring workflows.
We will walk you through the process of setting up an instance in the GCP using CE and deploying well-known data integration and workflow management tools like Airbyte and Airflow on it in this blog post. As a result, you will be able to manage your workflow management and data integration responsibilities in a safe and flexible environment. Let's get going!
Creating New Instance in CE
To create a new instance in GCP, you can follow these steps:
1. Open the GCP Console and navigate to the Compute Engine page.

2. Click on the "Create Instance" button to create a new one.
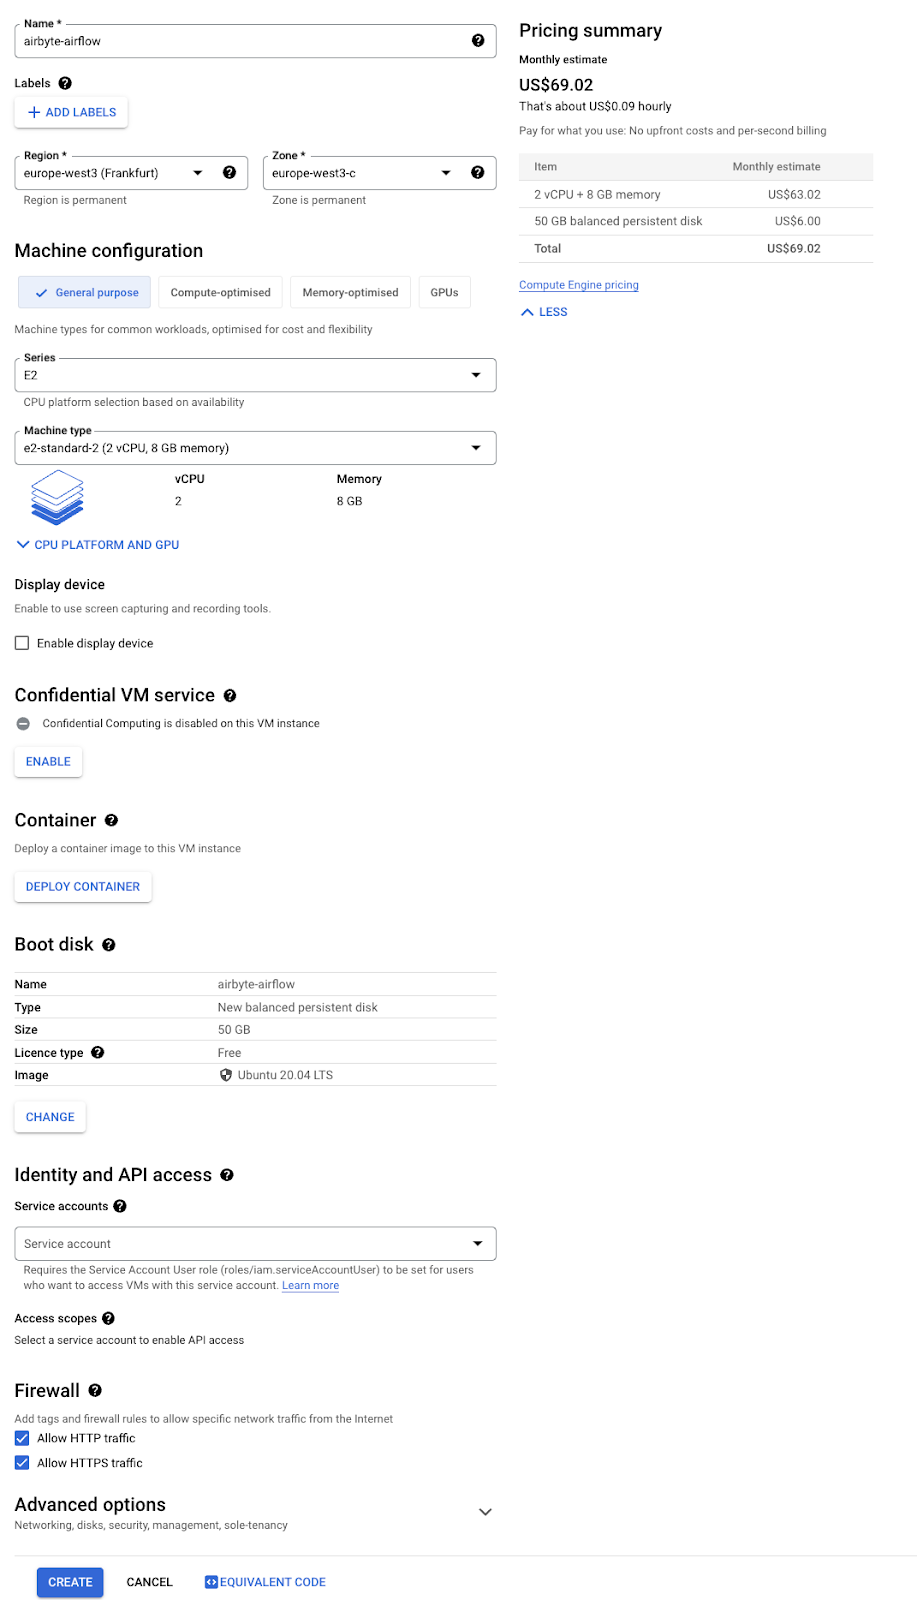
3. In the "Create an instance" dialog, enter a name for the instance.
4. Select a region and zone for the instance. The region and zone determine the physical location of the instance, so choose a region and zone that is closest to your users or your other resources.
5. Select a machine type for the instance. The machine type determines the number of CPUs and the amount of memory allocated to the instance. You can choose from a range of predefined machine types, or you can create a custom machine type.

6. Under the "Boot disk" section, select a disk image for the instance. You can choose a public image provided by GCP, or you can create a custom image.
7. Configure any additional options for instance, such as network settings, metadata, and labels.
8. Click on the "Create" button to create the instance.

Below you will find the screenshot with your settings and on the right side, you can already see the pricing that will occur.
After you have created the instance, you can connect to it using various methods, such as SSH or RDP, and deploy applications and services on it. GCP offers a range of services for managing and scaling your infrastructure, such as load balancing, auto-scaling, and managed databases. For this tutorial, we are going to SSH and run the necessary commands.
Click on SSH to connect to the instance.

Deploying Airbyte
This will open a new window in the terminal interface and we can start deploying Airbyte and Airflow. I have already a set of commands written below, to deploy Airbyte and Airflow all you have to do is copy and paste them in the terminal, except for the command, where it says $USER. There you have to replace the $USER with your user_name.
sudo apt-get update
- This command updates the list of available software packages on your system.
sudo apt-get install -y apt-transport-https ca-certificates curl gnupg2 software-properties-common
- This command installs several packages needed to download and install Docker.
curl -fsSL https://download.docker.com/linux/debian/gpg | sudo apt-key add –
- This command downloads the Docker GPG key and adds it to the apt keyring.
sudo add-apt-repository "deb [arch=amd64] https://download.docker.com/linux/debian buster stable"
- This command adds the Docker repository to the list of repositories that apt can access.
sudo apt-get update
- This command updates the list of available software packages on your system again, this time including the Docker packages from the Docker repository.
sudo apt-get install -y docker-ce docker-ce-cli containerd.iosudo apt-get update sudo apt-get install -y docker-ce docker-ce-cli containerd.io
- This command installs Docker and its dependencies. The packages installed are docker-ce, docker-ce-cli, and containerd.io.
sudo usermod -a -G docker $USER
- REPLACE $USER with your user_name
- This command adds the current user to the docker group, which allows the user to run Docker commands without using sudo.
sudo apt-get -y install docker-compose
- This command installs Docker Compose, a tool used to define and run multi-container Docker applications.
docker-compose version
- This command verifies that Docker Compose is installed and displays the version number.
logout
- This command logs out the current user.
Now, connect to the instance by clicking SSH. Then, let’s deploy Airbyte by running the following commands:
mkdir airbyte && cd airbyte
- This command creates a new directory called Airbyte and navigates into that directory. The subsequent commands are executed in this directory.
curl -sOO https://raw.githubusercontent.com/airbytehq/airbyte-platform/main/{.env,docker-compose.yaml}
- This command uses curl to download two files from the Airbyte GitHub repository: .env and docker-compose.yaml. The -s flag is used to suppress unnecessary output, and the -O flag is used to save the files with their original names.
curl -sOO https://raw.githubusercontent.com/airbytehq/airbyte-platform/main/{.env,flags.yml}
- This command uses curl to download two files from the Airbyte GitHub repository: .env and flags.yml. The -s flag is used to suppress unnecessary output, and the -O flag is used to save the files with their original names.
docker compose up -d
- This command uses Docker Compose to start the Airbyte platform in detached mode. The -d flag is used to run the containers in the background.
Once everything is running smoothly, you should have something like this:

We can now already start Airbyte. Click on the name of your instance and scroll down to the Network interface section and then copy your External IP address.

Go to link: http://<external_ip_address>:8000. This should open a prompt to enter username and password. By default, the username is airbyte and the password is password.

Once we enter the username and password, we will be greeted with a welcome page with a warning that we need to change the password, so let’s do that first.

Let’s go back to our terminal and type the following command to first shut down the docker:
docker compose down
Now, open docker-compose.yaml file via Vim, by typing:
vim docker-compose.yaml
If you scroll down to the end and find the environment section, there you have to change BASIC_AUTH_USERNAME and BASIC_AUTH_PASSWORD to your desired username and password.

How to use Vim:
If you are not familiar with Vim, then first place the cursor where you want to edit and then press “i” in the keyboard, this will take you to “INSERT” mode then you can edit like in a normal editor. When you are done, then press alt+backspace to get out of insert mode. Now to quit, simply type “:wq” this will write and quit the file from Vim.
Now, to start the docker, type the command:
docker compose up -d
Once docker starts, you can again go to your external-IP-address http://<external_ip_address>:8000, and now you enter the new username and password.
NOTE: Never share your username, password, and your external IP address with anyone.
In the next, blog, we will go through how to make connections in airbyte and export data to Bigquery, so stay tuned for it.
Deploying Airflow
Now, airbyte is up and running let's go back to your terminal and deploy airflow. First, make sure you are in home directory, if you are not sure just type
cd ..
- This will bring you back to home directory and to deploy airflow, enter following commands:
mkdir airflow && cd airflow
- This command creates a new directory called airflow and navigates into that directory. The subsequent commands are executed in this directory.
curl -LfO 'https://airflow.apache.org/docs/apache-airflow/2.5.1/docker-compose.yaml'
- This command uses curl to download the Docker Compose file for Apache Airflow version 2.5.1 from the official Airflow website.
mkdir -p ./dags ./logs ./plugins
- This command creates three directories (dags, logs, and plugins) in the current directory. These directories will be used by Airflow to store DAGs, logs, and plugins.
echo -e "AIRFLOW_UID=$(id -u)" > .env
- This command sets the AIRFLOW_UID environment variable in a file called .env. The value of AIRFLOW_UID is set to the UID (user ID) of the current user.
docker compose up airflow-init
- This command uses Docker Compose to initialize the Airflow database. This command should be run once before running the Airflow webserver or scheduler.
docker compose up -d
- This command starts the Airflow webserver and scheduler in detached mode. The -d flag is used to run the containers in the background.
Once all the steps are cleared, you should have something like this:

Similar, to Airbyte, if you want to open Airflow, you just need to change the port number to 8080. Ie. http://<external_ip_address>:8080 and you should see the login page

Again the default is very basic. The username is airflow and the password is also airflow. You will now see different DAGs which come preinstalled and you can ignore them. The first thing first is to change the username and password. Click on Security -> List Users and click on “+” icon.

Now we know that airflow is also running, later in the series, we will also go into detail on how to delete default DAGs and run our own DAGs.
Conclusion
In conclusion, creating a new instance in Google Cloud Platform Compute Engine is a relatively straightforward process. By following the steps outlined in this blog, you can quickly create a new instance and install Docker and Docker Compose. Once Docker and Docker Compose are installed, you can deploy Airbyte and Apache Airflow on your instance.
Airbyte is a powerful open-source data integration platform that enables you to connect to various data sources and move data between them. Apache Airflow, on the other hand, is a powerful open-source platform for programmatically authoring, scheduling, and monitoring workflows.
By deploying both Airbyte and Apache Airflow on your Compute Engine instance, you can build powerful data pipelines and workflows that can automate data integration tasks, schedule and run data processing tasks, and perform other data-related tasks.
In summary, the combination of Compute Engine, Docker, Docker Compose, Airbyte, and Apache Airflow provides a powerful platform for building and managing data pipelines and workflows in the cloud. With the help of this blog, you can quickly get started with creating your own data pipelines and workflows on Compute Engine.
Further Links
This post is part of the series on creating a full data pipeline or ETL process.
Check out our LinkedIn account, to get insights into our daily working life and get important updates about BigQuery, Data Studio, and marketing analytics
We also started with our own YouTube channel. We talk about important DWH, BigQuery, Data Studio, and many more topics. Check out the channel here.
If you want to learn more about how to use Google Data Studio and take it to the next level in combination with BigQuery, check out our Udemy course here.
If you are looking for help setting up a modern and cost-efficient data warehouse or analytical dashboard, send us an email at hello@datadice.io and we will schedule a call.


.jpeg)